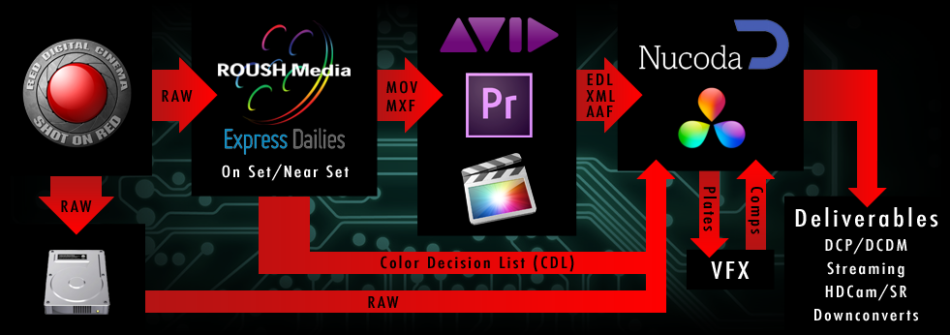
The Red Camera shoots a proprietary RAW image format called REDCODE RAW or a R3D file. As is the case with all tapeless cameras, you should be backing up your camera original files because they are like your negative. Hard drives work, but are not reliable enough for long-term storage, so we recommend LTO tape. This required by insurance and will create a long-term vault archive of your “negative.” Since RAW image data cannot be viewed unless it is debayered (converting a bayer-pattern color filter array image from a single sensor to a full RGB image). To decode the Red file, it takes a lot of processing power. In order for your offline editing system to handle the job, dailies media files are created. In this process, transcoding the R3Ds to QuickTime ProRes (.mov) for Final Cut Pro or MXF DNxHD for Avid is necessary to have real-time performance in your FCP or Avid system. Dailies are also where you pass the metadata (time code, camera roll, reel name, etc.) from the camera to your offline edit. Lock your picture, and now we are ready for the finishing to begin!
At this point, we have some choices on how to finish depending on what your end product needs to be and your budget and therefore what compromises you have to make. Also, the details and type of project factor into making workflow decisions. We recommend having your post house involved in the discussion for your workflow at the beginning. This will help you avoid the pitfalls that can and often do arise when projects reach post. If you can leverage the experience of people who finish lots of these films, you will be better off. Every format has its own idiosyncrasies and RED is no exception. You should know what they are before you budget for post and shoot your film. RED can look terrific, but you have to budget to finish your film well.
Working with RAW RED files
As with all raw formats, you have a double-edged sword: you defer the entire image processing to post (debayering). It is all about processing your image at this point (color space, gamma, color temperature, noise and detail, and how you are rating the ISO or exposure). This allows a lot of flexibility if you have the experience and tools to access the format’s metadata in your finishing & DI color system. This can also lock you into problems if one of the settings is wrong for your look and you do not have access to correct it. In nearly every RED camera project we have done, the metadata set into the R3D files has been wrong for at least one shot. For example, the ISO has been rated too high on a shot and the image pushed too far, creating lots of noise. This was probably done so that someone on set could see a brighter image in the viewfinder or monitor. There was nothing wrong with the shot, but the metadata was incorrect.
Color Space options
The R3D format will allow for different gamma outputs: REC. 709, REDSPACE, REDLog, PDLog. What you use for each stage depends on what you’re trying to do. For example, for your dailies and offline edit, you will choose REC.709 in order to gain more contrast and saturation, but you will clip image detail in the highlights. If you liked the image the way it is and only wanted to do very limited or no color correction, this could work, but you are cutting down the dynamic range the image sensor originally captured. With REDSPACE’s gamma curve, you can still work in a linear video space, but not clip the dynamic range. It’s a flatter image, but once a colorist grades it, he can increase the contrast and keep the image detail in the highlights and blacks. REDLog would be for working in a Log space color management workflow with LUTs for a film out.
The No-Compromise Conform
From your offline, we will load the EDL and perform a data conform to the original RAW R3D 4K RED files. Next, the edit is checked to a client supplied offline movie file to make sure there are not errors in the EDL. We now access RED’s metadata and set up the gamma, color space, and other settings for how the Nucoda will debayer the R3D image files. This can all be done very quickly and cost effectively and is the foundation to a good looking RED camera project. Sure you can try to do it in FCP, but it is very time consuming, there is little access to metadata, it’s often done in a compressed HD 4:2:2 sub-sample and it’s not nearly as good as if it was done with a heavy hardware DI system.
Color Grading
The art and craft of color correction in our nonlinear DI theater or video suite is something to be experienced. A talented DI colorist works with you to create and achieve the look & balance you desire. The accuracy of our color is maintained across your different distribution formats and mastered from the Nucoda DI system with the use of LUTs including: film, digital cinema, HDTV, and Blu-Ray.
Deliverables
Deliverables include: HDCAM SR, DI archive of the 4K, 2K DPX files (onto LTO 4 Tape or hard drive), DCP, Film outs, Blu-Ray & DVD screeners. Many other video tape formats and aspect ratios are also part of your options.


